
Saturday, 20 October 2012
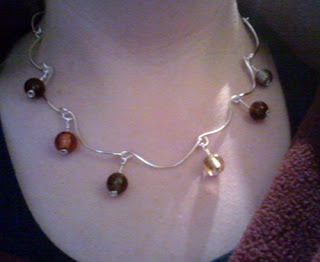
Silver necklace with autumnal beads
A new necklace made from loops of wire with beads hung from the joints.

Saturday, 6 October 2012
Photos from Battle Abbey
Nick and I visited Battle Abbey during the week and what a beautiful day for photo taking! Here are a few of my favourites:


A Dove on the Abbey walls

Light distorted by the phone camera lens in the basement

Stunning patterns in the mud floor from

And a doorway that made me think of a secret garden.
Saturday, 29 September 2012
Plaited bracelets with beads
After the five and eight strand plaiting last month I thought I would settle with some "easy" three strand braid when I introduced beads. Experimenting with threading beads at different intervals in the plait produced some interesting and quite different results. I like the glass beads with the silver wire especially when the light is shining on them. Here are three variations:


Small round beads make a very tight, neat braid. Here the beads were threaded on every time a wire crossed another.

Oval beads make a nice open design. The beads here were also threaded on every time a wire was crossed.

In this case oval beads were only threaded on when the wire crossed to the right so all the beads point in the same direction.
Sunday, 16 September 2012
Seahorse photo frame
As usual I was struggling to work out what to get my Dad for his birthday. I decided in the end to decorate a photo-frame for his bedside table. I went with an under the sea theme as this seemed like it had some possibilities. The seahorse, shell and starfish were made with silver plated jewellery wire and small beads. These were then attached to the frame with PVA glue (which dries see-through so can't be seen). I found a frame that looked like it had sand waves on it and added some extra waves with more metal wire.


The shapes before they were mounted ...

and after.
Friday, 7 September 2012
Crochet bracelet
One of the new skills I have learnt this year is the basic crochet stitch - I am not the most talented at this I have to say; it doesn't come naturally. After quite a lot of practice I managed to make this bracelet. It isn't as complicated as it looks I have simply chain stitched nine lengths of very thin jewellery wire and then plaited them. These three plaits have then been woven together with some beads added in for extra prettiness. The result is this beautiful bracelet that (as long as you don't sit on it accidentally) can be worn again and again.


Saturday, 18 August 2012
Plaited wire bangles
Until this week I had only ever plaited with three strands but found some instructions for 5 and 8 strand plaits. At first this seemed impossibly complicated but a little practice and it started to make sense and the results were some lovely silver bangles.

They aren't perfect (as I'm sure you can see) but I am pleased considering it was a first try. I need to learn to size them better (both turned out huge!) and I need to find a better way to hold the two ends together when they are done. Getting an even plait also proved to be quite difficult particularly with the 5 strand plait. But otherwise I am there ;-)
 Definitely some potential for these with considerably more practice!

They aren't perfect (as I'm sure you can see) but I am pleased considering it was a first try. I need to learn to size them better (both turned out huge!) and I need to find a better way to hold the two ends together when they are done. Getting an even plait also proved to be quite difficult particularly with the 5 strand plait. But otherwise I am there ;-)

Saturday, 7 July 2012
Butterfly fall tree
So as I promised there is now a second tree. I couldn't resist decorating this one with brightly coloured origami butterflies!


Saturday, 30 June 2012
Star tree
I have recently started to play around with metal wire to make jewellery. I however came across this thicker metal wire (aluminium I believe) that was very pliable. I instantly thought that I wanted to make a tree, I don't know why just one of those things. Anyway once the tree was made I decided to decorate it with paper origami stars in purple and lilac and here is the result:


It stands about a foot tall (ish) and has made a lovely calming addition to my studio (spare room) :-). I have some other ideas so watch this space for some more trees in the near future (hopefully)
Saturday, 23 June 2012
Foxgloves
I have always loved foxgloves, they are so bright and beautiful. We planted some seeds in the garden a while ago and this year they have come in to full bloom. A great opportunity to get the camera out and take some photos.


Tuesday, 8 May 2012
Spring herbs in a fish supper

Preheat the oven to 210 degrees (190 degrees for a fan oven)
Serves 2 (although easily doubled)
Ingredients:
2 cloves of garlic
Rind and juice of half a lemon
3 slices of bread
2 fillets of white fish (we used haddock but you could use pollack)
8 sprigs of fresh mint
A handful of soft herbs (we used parsley and chives)
Frozen garden peas
2 tomatoes
Olive oil

4. Put your fish fillets on a plate and spread over your herby breadcrumbs. Drizzle with olive oil, this will stop the fish drying out. Rinse the food processor out because you will need it in a minute.
3. Cut the tomatoes in half and put in a pyrex dish or baking sheet, drizzle with olive oil and put in the oven.
2. Boil some water in a saucepan and then add the peas (about half a cereal bowl) along with the mint leaves. Boil for three minutes and drain. Put the peas, mint leaves and a little oil in the food processor and blitz. Season with some black pepper.
5. Once the tomatoes have had 15 minutes put the fish on the same tray as the tomatoes and put back in the oven.
6. Once the breadcrumbs on the fish have started to brown (approx 10-15 minutes) put the mushy peas in a frying pan and heat over a medium heat.
7. Serve the fish, tomatoes, and mushy peas with some chips or a couple of slices of bread a butter.
Variation: The breadcrumbs also work well baked on large mushrooms. Ideal if you have a vegetarian in the family or simply fancy something different. Put the mushrooms in with the tomatoes and add the breadcrumbs when the fish would have gone in!

Subscribe to:
Posts (Atom)