Please note all photos belong to the author of this blog. Please enjoy looking through them but do not use without permission.
Showing posts with label Handmade. Show all posts

Tuesday, 1 January 2013

Happy New Year

Here we are again, the start of a new year, how quickly time flies! 


2012 has been a very busy year and I have learnt so many new things. One of the most rewarding is making my own jewellery including this bracelet made from silver wire and glass beads

Hopefully this coming year will bring some new projects full of interesting things to try and skills to learn. Hope you all have a great 2013!!

Saturday, 22 December 2012

Christmas oranges

So it is nearly Christmas again! This year has been an interesting one and unfortunately I have been ill for quite a lot of it. As a result I haven't been able to post as much as I would have liked to. Fortunately I did manage to keep making things and remained in the habit of taking photos. So over the next few days I am going to backdate my blog with the projects I have done this year. This may seem like cheating to many bloggers out there but this blog was set up as a scrapbook of my projects. It seems a shame not to use the photos I have taken - hope you enjoy! 

In the mean time a Christmas treat - dried orange slices. I have always seen oranges as a Christmas fruit and love them hung on the tree or in garlands. I don't know why I hadn't realised they were so easy before but this year I actually made some and they really are very simple. 

1. Cut your oranges in to equal slices about 0.5 cm wide is ideal (I used 2 oranges which filled a small bowl)
2. Line a baking tray with baking paper (this will stop the oranges sticking to or reacting with the metal tray)
3. Lay your orange slices on the baking paper and sprinkle both sides with icing sugar
4. Put in a cool oven (I used about 100 degrees centigrade) and bake until they are dry and hard (can take some time - the thickest of mine took ~ 2 hours)
5. Hang with ribbon for the tree or garland or put in a bowl with cinammon and cloves for a classic Christmas smell!


Saturday, 15 December 2012

Bubble jewellery

The beads in this necklace and bracelet set remind me of bubbles hence the title. There are so many ways to braid wire with beads and each one looks different which means with some very basic techniques you can make endless individual pieces. Here I have used a mixture of bead sizes, shapes and colours and intertwined silver wires (three for the necklace and four for the bracelet) to create a random pattern of spots - so pretty!


Bubble bracelet

Bubble set

Bubble necklace

Saturday, 8 December 2012

Blue and green necklace

A new necklace made from silver wire and glass beads.


Sunday, 4 November 2012

Lighthouse painting

Another new painting with chalk pastels over the top:


Saturday, 27 October 2012

Saturday, 20 October 2012

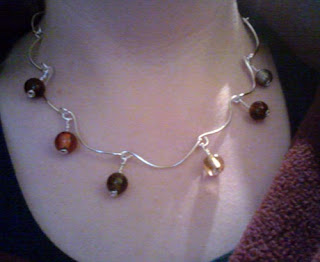
Silver necklace with autumnal beads

A new necklace made from loops of wire with beads hung from the joints. 


Saturday, 29 September 2012

Plaited bracelets with beads

After the five and eight strand plaiting last month I thought I would settle with some "easy" three strand braid when I introduced beads. Experimenting with threading beads at different intervals in the plait produced some interesting and quite different results. I like the glass beads with the silver wire especially when the light is shining on them. Here are three variations:

Small round beads make a very tight, neat braid. Here the beads were threaded on every time a wire crossed another. 


Oval beads make a nice open design. The beads here were also threaded on every time a wire was crossed. 


In this case oval beads were only threaded on when the wire crossed to the right so all the beads point in the same direction. 

Sunday, 16 September 2012

Seahorse photo frame

As usual I was struggling to work out what to get my Dad for his birthday. I decided in the end to decorate a photo-frame for his bedside table. I went with an under the sea theme as this seemed like it had some possibilities. The seahorse, shell and starfish were made with silver plated jewellery wire and small beads. These were then attached to the frame with PVA glue (which dries see-through so can't be seen). I found a frame that looked like it had sand waves on it and added some extra waves with more metal wire.

The shapes before they were mounted ...

and after.

Friday, 7 September 2012

Crochet bracelet

One of the new skills I have learnt this year is the basic crochet stitch - I am not the most talented at this I have to say; it doesn't come naturally. After quite a lot of practice I managed to make this bracelet. It isn't as complicated as it looks I have simply chain stitched nine lengths of very thin jewellery wire and then plaited them. These three plaits have then been woven together with some beads added in for extra prettiness. The result is this beautiful bracelet that (as long as you don't sit on it accidentally) can be worn again and again. 


Saturday, 18 August 2012

Plaited wire bangles

Until this week I had only ever plaited with three strands but found some instructions for 5 and 8 strand plaits. At first this seemed impossibly complicated but a little practice and it started to make sense and the results were some lovely silver bangles. 


They aren't perfect (as I'm sure you can see) but I am pleased considering it was a first try. I need to learn to size them better (both turned out huge!) and I need to find a better way to hold the two ends together when they are done. Getting an even plait also proved to be quite difficult particularly with the 5 strand plait. But otherwise I am there ;-)

Definitely some potential for these with considerably more practice! 

Saturday, 7 July 2012

Butterfly fall tree

So as I promised there is now a second tree. I couldn't resist decorating this one with brightly coloured origami butterflies! 


Saturday, 30 June 2012

Star tree

I have recently started to play around with metal wire to make jewellery. I however came across this thicker metal wire (aluminium I believe) that was very pliable. I instantly thought that I wanted to make a tree, I don't know why just one of those things. Anyway once the tree was made I decided to decorate it with paper origami stars in purple and lilac and here is the result:


It stands about a foot tall (ish) and has made a lovely calming addition to my studio (spare room) :-). I have some other ideas so watch this space for some more trees in the near future (hopefully)

Friday, 27 April 2012

Wholemeal rolls


I have recently started making my own bread - it does take time but is so rewarding and actually much better for you than most shop bought bread. I have been experimenting with different flours and this is my favourite combination yet. These rolls aren't too heavy because of the addition of white bread flour but do have a lovely texture and a crispy crust. The preparation only takes about 20 minutes in total but you do need to leave the bread to rise so the whole process takes over 3 hours (although obviously you can do other things while you wait). 

Makes 6 rolls

Ingredients:
300ml lukewarm water
2 ½ tsp dried yeast
1 tsp brown sugar
225 g strong white bread flour
225 g strong wholemeal bread flour
1 tsp salt

  • Mix the yeast and sugar in to half of the water and leave for about 15 minutes.
  • In the meantime mix the flour and salt in a large bowl.
  • When the yeast is ready make a well in the flour and pour the yeast mix in.
  • Stir the yeast mix into the flour
  • Add the rest of the water and combine into dough – this is easiest with your hands!
  • You are aiming for slightly sticky dough that pulls all of the mixture away from the edge of the bowl. You may need to add some more water, do this one tablespoon at a time until the dough leaves the bowl clean.
  • Flour a flat surface and knead until it is completely smooth and elastic, this may take 10 minutes but it so worth the effort.
  • Get a clean bowl (or clean the one you were using before) and use a piece of kitchen towel to spread some olive oil in a thin layer around the inside. Put your dough ball in to this bowl and cover with some cling film and a tea towel. Leave in a warm place (e.g. airing cupboard or windowsill) for 2 hours.

  •  Prepare a baking tray by sprinkling it with a fine layer of polenta grain (this will help to stop the rolls from sticking).
  •  Take the dough out of the bowl and on a floured surface knock it back (literally push your fist in to it to knock the air out) and then knead for about two minutes (this might seem counter-productive since you have just left it to rise but is vital if your bread is going to behave properly!)
  • Shape your dough into 6 equal balls and place on the baking tray.
  • Loosely cover the rolls with cling film and a tea towel and put back into a warm place for about 30 minutes.

  • Preheat the oven to 190 °C and boil a kettle of water. Find a deep baking tray or oven proof dish.
  • Once the oven is warm put the deep baking tray on the bottom shelf filled with boiling water, the rolls need to go on the top shelf for about 30 minutes. They are ready when crispy brown on the outside and the bottom, when knocked, sounds hollow.
  • Leave to cool on a wire cooling rack – enjoy!


Delicious with soup or as a sandwich! They will keep for a few days but also freeze well for a couple of weeks.

Sunday, 22 April 2012

A New Skirt

Sorry it has been a while, how time flies when you are having fun! We have had a busy couple of weeks what with the Easter break and the garden demanding more and more of our time. I have however managed to get to my sewing machine and the result is this new skirt. Now this is the first time I have ever made a piece of clothing without a pattern (and to be fair I have never been all that successful with a pattern). It isn't of the highest standard but I am learning fast (for example don't put a pleat right next to the zip because it just looks odd!) and to be fair I would wear it out in public (which is probably a good sign). 


The design is very simple. An interfaced belt section provides some structure to the top of the skirt and then the bottom is too rectangles (one front and one back) that have pleats in the top to make them the same length as the belt. This allows some volume and gives you the "bell" shape. The inside is lined in satin and the outside is a heavy cotton.

Since making this skirt I have also started to make a waistcoat (which is much more complex and may be a step too far). I will hopefully be able to post photos of the finished article (good or bad) in the coming weeks along with an update on the garden and hopefully some new recipes! 

Tuesday, 20 March 2012

Two new bags


This weekend I made two new bags from this gorgeous material I found last week. The bag above is for my Grandma so that she can carry her canvases to art class. It has long and short handles (for ease of carrying) and a small zip pocket for bus money (or as I suggested to Grandma the far more important cake money).


I had some material left so decided to make myself a satchel for work. The material itself is heavy cotton designed for curtains and is very easy to work with. The sides are reinforced with heavy interfacing and it is lined with satin. There is a long zip pocket on the back and a cross body strap. I was also thinking I might spray my bag with a waterproofing spray so that my stuff doesn't get too damp in a downpour. 

Quite a productive weekend I think, and since I have only ever made shopping bags before I am quite proud of the satchel. I didn't use a pattern (rather just made it up as I went along) but if I was to try something more complicated I think I would. There is a little bit of material left so I will have to think of something else to make. :-)

Thursday, 8 March 2012

Cereal box magazine files

Every year we seem to collect magazines and paperwork on every flat surface of our sitting room and kitchen. We always want to keep the stuff but it's a pain. I realised what we really needed was some magazine files but I didn't really want to go out and spend money on them. I had been saving cereal boxes for some time and realised that they were the perfect size. A few cuts later and here is the result:


A handmade magazine file within seconds and no money spent. I quite like the pattern on the box (especially in the kitchen) but if you would rather plain ones you could paint over the cardboard with white gloss or acrylic and even stick on wrapping paper or colourful magazine pages to cheer them up a bit. OK they are not as strong as the plastic ones you can get but they are so quick, easy to make and free. :-)

Saturday, 28 January 2012

Bringing a table back to life

We have a table that is perfectly functional but has lost a little of its former charm. The main problem is that it has been moved one too many times and has started to chip. It wasn’t an expensive table in the first place but it seems a shame to chuck it out if we can still use it. So I decided to come up with a way to bring it back to life. We could have just painted it but that seems a bit boring. The curtains in our sitting room are made from some lovely material featuring flowers and birds and I thought it would be nice to produce something to match.

I found come lovely wrapping paper that was in the right colours and had some nice shapes. Having cut out the individual plants etc. I used some permanent adhesive spray (you can get this in any good craft shop) and sprayed the table. The spray should hold the paper cutouts in place and due to it having less moisture doesn’t create the bumps and wrinkles you would get using PVA. Then I stuck the cut out wrapping paper in place. This was harder than I had envisaged (as these things tend to be) as I kept sticking my fingers to the table instead, but eventually I got there.
When I get around to it (or Nick gets fed up of tripping up over it every time he goes to the fridge) I will apply a layer of varnish over the top. This should seal the table so that we can use it again. This is a very cheap way to update a piece of furniture – just some adhesive spray, some wrapping paper and some varnish. Instead of wrapping paper you could use old glossy magazines and make beautiful mosaics or just random swirls of colour. If you are using thick paper you can usually get away with PVA but for anything thin it is best to use adhesive spray.

Top tips:
  • Remember to clean your table carefully first – dust caught in the glue is generally not a good look!
  • Lay your design out before you start so you know where things are going.
  • Shake the adhesive spray well and don’t hold the can too close to the table (it is a good idea to experiment with the spray first so you can get as smooth a result as possible).
  • Seal your final design in some general furniture varnish (any good craft shop or DIY should stock varnish).
And in other news ....

The winter garden experiment - an update

We have the first signs of life :-) - the rocket, spring onions and salad are just starting to show. Pots that started in bags need to come out as soon as any seedling come up but if you are using a propogator then leave them be. The soil needs to be kept slightly moist (but not wet!).

Sunday, 1 January 2012

Happy New Year!

Sorry I know it has been a while since we last posted. This is partly because we have been away visiting relatives over the Christmas period, but also because we have been finishing the Christmas presents we were making. It was a close run thing but we did get them all finished in time! Here are a few pictures of some of the things that we made:


The presents include homemade beads strung on to ribbon to make necklaces and bracelets. Some paper stars made in to earrings and a bracelet. Shopping bags made with curtain material and lined with satin. Picalilli, Chilli Jam, filled spice grinders and the hampers mentioned in a previous post. We also finally finished the baubles (we managed to make 6 whole sets although there were unfortunately a couple of disasters (a new method for sticking needed I think)). I also found some really cool buttons in a local material store which I attached to ribbon to make bracelets. There were some other bits and pieces but I forgot to photograph them - oops but I think you can get a good feel for what we have done.

It was so much fun making them all but such a relief that we managed to finish them all in time. Hopefully the coming year will be filled with new projects to write about! We wish everyone a happy New Year - and hopefully won't leave it quite so long until we post again. 

Sunday, 27 November 2011

Lemon and lime cordial


Over the last month or so we have been collecting homemade items to include in our Christmas hampers. One of the things we have made is lemon and lime cordial. It is so easy to make, has no artificial ingredients and tastes so much better than the ones you buy in the shop!

You will need:
1 kg of caster sugar
500 ml of water
10 lemons
5 limes

This makes about 1.5 litres.

1. Using a potato peeler peel the rind of 4 lemons and 2 limes; do this gently so that you include as little of the white pith as you can. (The pith is bitter and will change the taste of your cordial).
2. Put the water in to a large saucepan and bring to the boil.
3. Stir in the sugar.
4. Once the sugar is dissolved add the lemon and lime peel and simmer for about an hour, stirring occasionally.
5. While you wait juice the lemons and limes (a food processor with a juicing attachment will help with this). You need about 1.5 litres of juice.
6. After the hour is up, add this juice to the saucepan and simmer for a further 30 minutes.
7. Remove the peel from the cordial (using a slotted spoon) and lay out on greasproof paper.
8. Bottle up the cordial in pre-cleaned and dried bottles. Store in a cool dry place until opened when it should be put in the fridge. It tastes great with sparkling water, a slice of lemon and some fresh mint!
10. You can preserve the peel by sprinkling it with a little icing sugar. It is delicous as a sweet or sprinkled on ice cream. 

The hamper also includes carrot jam (see earlier post), pineapple chutney, spice grinders and recipe cards.